

Have an enquiry?
Call 0412 503 247 or email [email protected]
Print File Setup
Things to know when setting up print files…
1. PDF Preferred
Please try and supply your artwork as a PDF file type. We do accept other file types (tif, jpeg, gif, png and pub) but be warned if your artwork file is not “print ready” which means it requires nothing more from us than opening it to ensure it’s correct then extra charges may apply. (See details below)
Please Note: We DO NOT accept artwork set up in Microsoft Word.
2. Proof Your Artwork
Please proof your artwork file before sending it through to us. OnClick takes no responsibility for any errors on supplied artwork files. We will email you a proof of your file to double check prior to sending for print.
3. Check Printed Copy
Please make sure you print out a copy of your artwork file preferably @ 100% and check the colours and sizes. Check that all the fonts you used haven’t defaulted. Check everything thoroughly BEFORE sending it to us. We’ve found most current CMYK printers give you a good indication of the final printed product.
4. Image Resolution
You need to understand about image resolution. A good rule of thumb when setting up a PDF document is when you view your PDF, enlarge it to 400% and this gives you a good indication of the final product quality. If the images are bitmapping or the type is displaying incorrectly it needs to be fixed and rechecked BEFORE sending us your file.
5. No Trim Marks
Please do not include trim marks on your artwork file. When we open your artwork file we want to see the artwork set up @ 100% for all sizes up to A3 and no less than 25% of the final size for sizes larger than A3 – posters, banners etc.
6. File Size
If your artwork file size is too big for emailing (over 3MB) or uploading (over 10MB) then simply contact us and we will make special upload arrangements.
If you have any questions about any of the above please contact us and we are only too happy to assist.
Extra Charges
Please note: If your artwork file is not supplied print ready our standard hourly rate of $90 ex GST applies with a $30 ex GST minimum.
Saving a PDF
A pdf file is the most versatile file type accommodating multiple elements such as text, photographic images and line drawings. Most of the modern graphics programs offer to “Save As” a pdf file so that you can easily send your artwork to your printer.
We recommend saving pdf files as artwork from programs such as Adobe InDesign, Adobe Illustrator or Canva.
If your pdf file is not set up correctly then you can be disappointed with the printed result. Below we’ve outlined what you need to know to prepare a PDF file ready to go to print.
Vector Artwork
Vector artwork is a series of mathematical equations. The pdf’s strength is its ability to save vector artwork. This is storing a curve as two coordinates and an arc between them. A vector file can be enlarged or reduced without losing quality.

Image Files
Any image file such as a jpg or tif used to set up artwork must be at least 300dpi and no smaller than 100% of the final size to ensure good reproduction. If you’re supplying a jpg or tif file with type included in the content 600dpi will give you a better result.
Saving a PDF
In most programs as you select the “File” menu and either “Export”, “Save As” or “Publish to PDF” you are presented with a series of options for setting up your pdf file.
PDF Checklist
- Convert all text to outlines or curves if possible, otherwise;
- Embed all fonts
- Included images must be high resolution no less than 300dpi
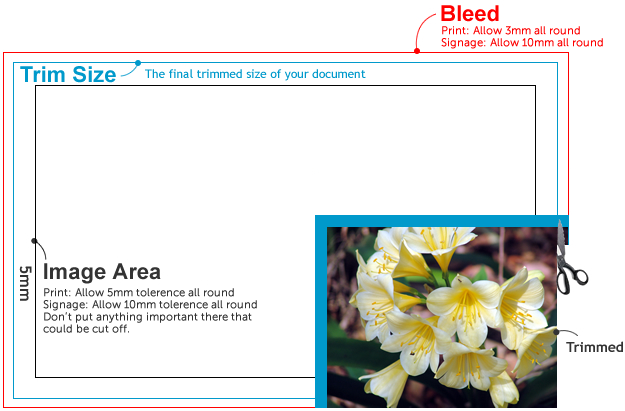
- Make sure bleed is included in the final file size. 3mm for print files and 10mm for signage files.
- Remove transparency and flatten layers in your graphics program first
- Single page document. Separate files per side or impression.
- Include trim marks or printers marks on your file
- Once saved, open your new pdf file in Acrobat Reader to test it.
Test the resolution of included images and check if any photos, images or logos are of high enough quality (resolution) to print out clearly. You do this by enlarging your pdf file in Acrobat Reader to 400% and see if the images are still clear and not fuzzy. If your logo or photos are going blurry then you may be disappointed with the printed result. Your images should be still crisp and sharp on screen at 400%. This is a simple but important step to follow.
Once you are happy with the pdf file you have created or email it to [email protected]
Image Resolution
An image which looks good on your computer screen is not necessarily good enough for printing.
Welcome to the world of image resolution. Computer screens display at a resolution of 72dpi. That is 72 little tiny dots (pixels) are butted up against each other in a line 1 inch wide. Why are we talking inches? I hear you say. This is one of the old measurements which has hung around in the printing industry as a term ‘dpi’ (dots per inch). All the image manipulation software also uses dpi so it has become a modern day measurement also.
To appear crisp and sharp to the eye on a printed product, images needs to be a minimum of 300dpi.
How do I know what resolution my image is?
Open the image in your image software and go to ‘Image Size’ in the menus and you should be able to find it there.
Do not enlarge the image
A common mistake people make is trying to increase the resolution of an image. This cannot be done. Once your image is scanned or downloaded, it already has its resolution set. Any changes you make in your software to it will not give you a higher quality image. You must go back and rescan it at a higher resolution or take another photo at a higher resolution to obtain a better image file.
Any images you use should be 300dpi for photos, and 600dpi for logos and line work.